STEP ONE
|

Save this small image above.

|
Firstly, save the small image to the left (or you can easily make your own - this ones just
4 pixels by 4 pixels) and open it in PSP. Select the image you wish to use.
|
STEP TWO
|


|
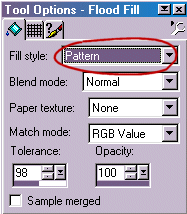
Choose [layers]->[new raster layer]->[ok] from the top menu, the new layer should now be active. Select the
'flood fill' tool ( ), select 'pattern' from the 'fill style'
dropdown. Then click the pattern tab, and select the hpattern.gif. ), select 'pattern' from the 'fill style'
dropdown. Then click the pattern tab, and select the hpattern.gif.
|
STEP THREE
|

|
Fill your image, should now look similar to the one on the left.
|
STEP FOUR
|
 Now go to your layer pallete (press Now go to your layer pallete (press to display layer option box
onscreen if needed), and in the 'layer blend mode' select 'darken'. You have the option now to change the transparency of the horizontal pattern. to display layer option box
onscreen if needed), and in the 'layer blend mode' select 'darken'. You have the option now to change the transparency of the horizontal pattern.
|
STEP FIVE
|

|
Just one thing left to do - [layers]->[merge]->[merge all(flatten)].
Finished, done, the end...
|


