STEP ONE
|

|
I'm using a 300x100 'canvas'. Select the 'text tool' ( ) and click on the canvas - the text options
will show. Select your font (I'm using Elephant 28pt). I chose black for this, dont really matter tho.
Make sure the 'floating' radio button is checked. Press ok. Place text in the desired position. Keep the selection active. ) and click on the canvas - the text options
will show. Select your font (I'm using Elephant 28pt). I chose black for this, dont really matter tho.
Make sure the 'floating' radio button is checked. Press ok. Place text in the desired position. Keep the selection active.
|
STEP TWO
|

|
Select the 'flood fill' tool ( ) and choose 'linear gradient' from the 'fill style'. ) and choose 'linear gradient' from the 'fill style'.
|
STEP THREE
|

|
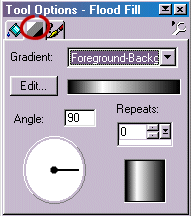
Select the gradient you want. For this, and the title text on this site, I chose
'foreground-background' with foreground white and background black. 90 degrees angle was the
direction I set. You can edit the gradient as much as you like by clicking on the 'edit' button
(bet you couldn't have figured that out) :)
|
STEP FOUR
|

|
Now fill in your text. You should now see a nice gradual effect on your words.
Now you can add your sparkle (click here to look at the
sparkle tut if you havent already).
|
STEP FIVE
|

|
Using the paintbrush tool, I put some 'light' onto the image. Use hardness and opacity
at about 20points. I used these brush sizes:
- 80points - single click
- 60points - single click
- 40points - single click
- 20points - 3 clicks
Modify these to suit your likings, but you know that... :).
|
STEP SIX
|

|
And here's the finished product.
Try some different colors and gradients
Have fun!!
|


